
SSH is a secure communication protocol that transfers data through a secure communication tunnel. SSH Tunneling is another technique through which attackers can bypass firewall restrictions and bypass them. This article will teach you How to Configure SSH VPN Tunnel on Ubuntu 20.04. If you intend to buy your own Ubuntu VPS server, you can check the packages offered on the Eldernode website.
Table of Contents
How to Setup SSH VPN Tunnel on Ubuntu VPS
SSH tunneling or SSH Port forwarding is a method of transferring network data through an encrypted SSH connection. In fact, it is one of the tools of OpenSSH that allows a TCP or UDP port to be forwarded over an SSH connection. OpenSSH can create a virtual Ethernet adapter on top of an SSH connection, allowing for full Layer 3 IP connectivity. This allows you to add routes that pass through this virtual connection as well as run a routing protocol across it.
Installing SSH VPN Tunnel on Ubuntu 20.04
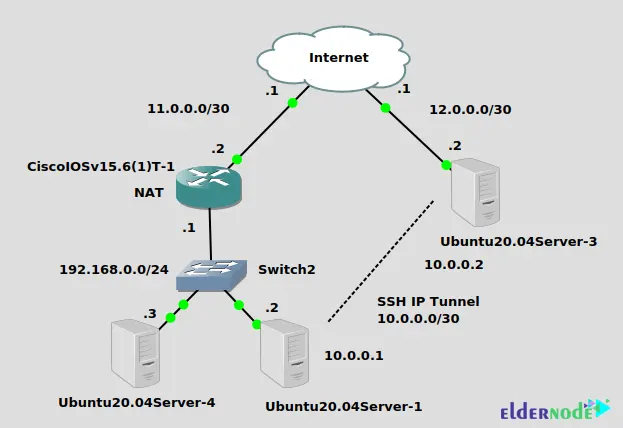
First, you will setup an IP SSH tunnel from Ubuntu20.04Server-1 on the left at private physical IP 192.168.0.2 to Ubuntu20.04Server-3 on the right with public physical IP 12.0.0.2. The SSH tunnel will use the 10.0.0.0/30 network. This tunnel goes through the NAT (PAT) set up on the Cisco router that connects Ubuntu20.04Server-1 to the Internet. No problem traversing NAT for IP SSH tunnel. In the last step, you will add static routes to allow Ubuntu20.04Server-4 to ping Ubuntu20.04Server-3 through the SSH tunnel.
Ubuntu20.04Server-3
In the first step, install the OpenSSH server with the help of the following command:
sudo apt-get install openssh-serverYou should log in as root from the client to create a TUN adapter. Open the following file with your desired text editor:
sudo nano /etc/ssh/sshd_configNow uncomment and change “PermitRootLogin prohibit-password” to “PermitRootLogin without-password” and “PermitTunnel no” to “PermitTunnel yes”.
Once you have done this, save the file.
Restart your OpenSSH server using the command below:
sudo systemctl restart sshdUbuntu20.04Server-1
In this step, install autossh tool that watches SSH sessions and restarts them if they die, by running the following command:
sudo apt-get install autosshLastly set up key authentication to log in as root to the server. To do this, enter the command below:
ssh-keygen -t rsa cat ~/.ssh/id_rsa.pub | ssh [email protected] "mkdir -p ~/.ssh && cat >> ~/.ssh/authorized_keys"Connecting the Tunnel on Ubuntu 20.04
First, enter the following command from Ubuntu20.04Server-1:
autossh -M 0 -o "ServerAliveInterval 30" -o "ServerAliveCountMax 3" -NTC -o Tunnel=point-to-point -w 0:0 12.0.0.2 &– -M 0: Don’t use it, it refers to monitoring the TCP port
– -o “ServerAliveInterval 30”: It sends a keepalive every 30 seconds
– -o “ServerAliveCountMax 3″: It retries keepalive a maximum of 3 times. Autossh ends here, and native SSH commands start next.
– -N: It instructs SSH not to execute a remote command
– -T: It disables pseudo-tty allocation
– -C: compression, may improve performance, may degrade
– -o Tunnel=point-to-point: It creates a virtual interface
– -w 0:0: It gives the local and remote tun adapters a number, in this instance 0. The left side of ‘:’ is local, and the right side is remote.
– 12.0.0.2: It is the tunnel destination
The final ampersand executes the command in the background, allowing you to get your shell back.
If everything is correct, you will have a “tun0” device on both the server and the client.
The “ip route” commands can be used to test, or netplan to survive a reboot:
On Ubuntu 20.04Server-1 (the client)
ip addr add 10.0.0.1/30 dev tun0 ip link set tun0 upThen add a static route for 192.168.0.0/24 pointing through the newly created tunnel to access that network using the command below:
On Ubuntu 20.04Server-3 (the server)
ip addr add 10.0.0.2/30 dev tun0 ip link set tun0 up ip route add 192.168.0.0/24 via 10.0.0.1Also add a route for the 10.0.0/30 network pointing to 192.168.0.2 to see that the tunnel works to route all IP traffic, not just traffic between the client and server:
On Ubuntu 20.04Server-4 (bystander at 192.168.0.3)
ip route add 10.0.0.0/30 via 192.168.0.2Note: The client should enable IP forwarding.
Now ping from Ubuntu 20.04Server-4 to Ubuntu 20.04Server-3 as shown below:
ping 10.0.0.2 PING 10.0.0.2 (10.0.0.2) 56(84) bytes of data. 64 bytes from 10.0.0.2: icmp_seq=1 ttl=63 time=3.87 ms 64 bytes from 10.0.0.2: icmp_seq=2 ttl=63 time=3.73 msLastly, ping from the server Ubuntu 20.04Server-3 all the way through to Ubuntu 20.04Server-4, going right through that NAT at the Cisco router as shown below:
ping 192.168.0.3 PING 192.168.0.3 (192.168.0.3) 56(84) bytes of data. 64 bytes from 192.168.0.3: icmp_seq=1 ttl=63 time=3.30 ms 64 bytes from 192.168.0.3: icmp_seq=2 ttl=63 time=3.69 msThat’s it!
Conclusion
SSH tunneling A port forwarding technique that allows a TCP or UDP port to be forwarded over an SSH connection. In this article, you learned how to configure SSH VPN Tunnel on Ubuntu 20.04. I hope you found this tutorial useful and that it helps you to configure the SSH VPN Tunnel on your Ubuntu server. If you face any problems or have any questions, contact us in the Comments section.