[Updated on Date: 2021-01-30] If I’m going to attack a company’s network or an organization’s network as a legitimate hacker, the first step is to scan the network’s open ports. If at the same time I realize that port 3389 is open on the target system, I will definitely conclude that I can connect to this system using the RDP protocol and using the Remote Desktop Connection. In this article, we’re going to learn how to change the default RDP port simply, which is 3389. On the other hand, we will learn how to connect to this system via Remote Desktop after you have changed this port number. Doing so can greatly prevent hackers from detecting systems in the early stages of network detection and provide us with a good degree of security. You can visit the packages available in Eldernode to purchase an Admin RDP server.
Table of Contents
Tutorial change the default RDP port simply
Well, so far it hasn’t been a problem, but what if I can’t find a port with this number in the target system? Or I find a port that has a strange number and I haven’t heard the count yet! Follow us in this article to learn step by step how to change the default RDP port simply to avoid potential risks.
How to change the default RDP port simply
RDP stands for Remote Desktop Connection. This protocol is one of the special network protocols that is used for telecommunication and allows the user to communicate between two computers and access the desktop of a remote host. In this article, you will see how to change the default port (port: 3389) in Remote Desktop Connection.
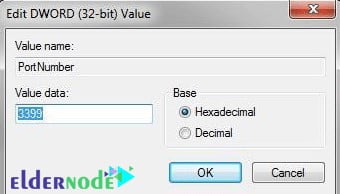
Only those who have a new port number will be able to communicate with the target system. For example, to do this, we need to change the TCP 3389 port to the 3399 port number. The port number you choose can be entirely up to you.
Change the default RDP port using Registry
Follow the steps below:
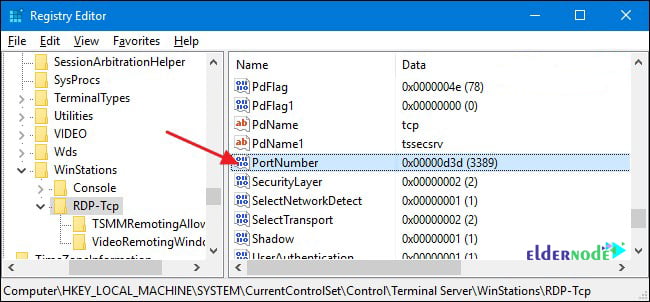
1- Enter the Registry section and the following path:
HKEY_LOCAL_MACHINE\System\CurrentConrolSet\Control\TerminalServer\WinStations\RDP-Tcp2- Find an entity called Port Number and double-click on it.
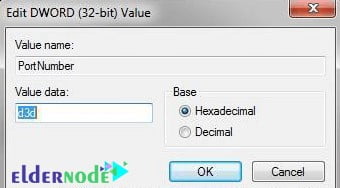
3- Change the number 3389 to your desired number. It may be displayed as d3d instead of 3389. Just make sure that the number of other ports does not interfere, preferably Well Known Ports.
4- Confirm and exit the registry and restart the system.
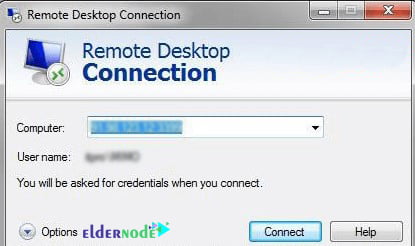
5- After the system comes up, you can remotely switch to the system through other systems using the MSTSC console and enter the changed port number.
*
**
Finally, you can connect to the desired computer via the remote desktop as shown below.
Conclusion
Using default ports on the network is not recommended at all because it is easily accessible by hackers and malicious Internet bots. One of the most important and vulnerable parts of the network is the Remote Desktop port 3389. In this article, we tried to fully and visually acquaint you with how to change the default port of the remote desktop.



What port does the remote desktop use?
The desktop remote uses port 3389 by default.
Do I need to change the default remote desktop port to prevent server hacking?
Yes, even if you have a static IP, it is recommended that you apply an IP restriction to your Windows servers.
What is the solution to clear the Remote Desktop history in Windows?
First, in the Windows search field, type regedit and enter it with admin access, and after selecting, go to the following path:
HKEY_CURRENT_USER\Software\Microsoft\Terminal Server Client
Click on its subdirectory and clear the Default options for clearing the remote history.
What is the purpose of changing the default remote desktop port?
What range should the selected port be in?
The selected port must be between 1025 and 65535.