Sometimes you may want to increase your disk space and partition capacity in Linux. For example, in VMware or VirtualBox or even ESXi, you gave the extra capacity to your Linux and Linux recognizes that extra space as unallocated. You do not want to create a new partition but you want to increase the partition that has limited space. In this article, we are going to teach you step by step How to resize root partition on Linux Ubuntu and Debian. It should be noted that you can visit the packages available in Eldernode if you want to buy a Linux VPS server.
Table of Contents
How to resize root partition on Linux Ubuntu and Debian
The method we are going to teach you in this article works on most Linuxes, including Ubuntu, Debian, and so on. So in the continuation of this tutorial, join us to introduce you to the Tutorial resize root partition on Linux Ubuntu and Debian.
What is a root partition?
The most important reason for partitioning is the optimal use of hard disk space and easier and faster access to classified information. You need to know that all the programs and software that you will later install on your system will be in the root partition. In fact, other directories related to the Linux file system will be placed as subdirectories within this partition. In other words, it is the storage location of the entire operating system. Like the partition, you install Windows into. In the next section, we will teach you how to Resize root partition on Linux Ubuntu and Debian. Please join us.
Resize root partition on Linux Ubuntu and Debian
In this section, we want to teach you how to resize the root partition on Linux Ubuntu. To do this, just follow the steps below. The first step is to expand the components of the file system. It should be noted that in this tutorial, the virtual machine disk size in VMware will increase from 18 GB to 28 GB.
Physical Volume >> Volume Group >> Logical Volume >> Filesystem
In the first step, it is necessary to see the current state of the physical volume. Therefore it is necessary to execute the following command:
pvdisplayAfter executing the above command, you will see the following image:

Now you need to manipulate the disk partition table in the next step using the following command:
fdisk /dev/sdbAfter executing the above command, you will see the following output. You must accept the default values provided to return the “n” option at this point.

Now you need to use the reboot command to apply the changes:
rebootIn the next step you need to update the partition table using the following command:
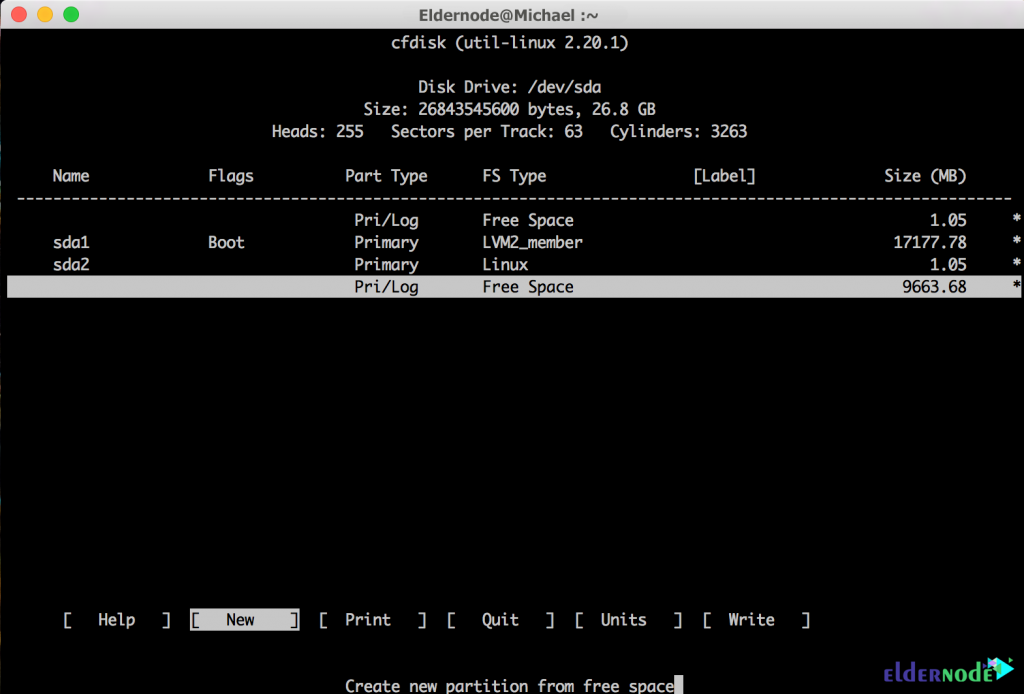
cfdiskThen you have to select [NEW] partition and [PRIMARY] in the next step to determine the type of partition. You also need to select and enter the desired partition size. Finally, you need to select [WRITE] to save the changes you have made. You must then save [QUIT].
Note: The new partition you created may be likely /dev/sda1.

You can now start the newly created partition by running the following command:
pvcreate /dev/sda3It’s time to add the newly created partition to the root volume group. You will need to first run the pvdisplay again to display new physical volume details. You can see the new partition as shown below:

After you have been able to successfully complete the above steps, you should now use the following command and get the name of your volume group:
vgsYou should expand the volume group and then verify your volume group again once complete using the following commands:
vgextend ubuvg /dev/sda3vgsIt should be noted that you must expand the Logical Volume using the lvextend command:
df -klvextend -L +10G /dev/mapper/ubuvg-ubulv

Finally, expand the Filesystem with the following commands to fill the logical volume:
resize2fs /dev/mapper/ubuvg-ubuldf -k

Conclusion
Before performing the method mentioned in this tutorial, it is better to make a backup or snapshot of your data or operating system. Because one wrong move can cause you to lose your data. In this article, we tried to teach you to step by step how to resize root partition on Linux Ubuntu and Debian.


