One of the best and most famous web servers for hosting one or more websites is Nginx, which will allow you to make specific changes in the network layer. You can run Nginx on the smallest virtual private server to the most powerful dedicated server with multiple clusters. This article will teach you How to Install Nginx on Arch Linux. If you intend to buy a Linux VPS server, you can check out the packages offered on the Eldernode website.
Table of Contents
Tutorial Setup Nginx on Arch Linux
What is Nginx?
Nginx is an open-source and powerful web server that you can use to serve static files. It serves as a proxy server for email communications protocols, such as IMAP, POP3, and SMTP. This web server improves security, content, and application delivery, and facilitates scalability and availability for the busiest websites on the internet. You can run Nginx on various operating systems such as Solaris, OS X, HP-UX, AIX and Linux, and Windows as well as various BSDs.
Installing Nginx on Arch Linux
The first section is about installing Nginx on Arch Linux. The Nginx web server package is available in the default Arch Linux repository by default. All you have to do to install it is run the following command:
pacman -S nginx-mainlineAfter Nginx is installed, enter the following command to start it:
systemctl start nginxYou can enable Nginx using the command below:
systemctl enable nginxIf you want to check the Nginx status, just run the following command:
systemctl status nginxAccessing Nginx Web Server on Arch Linux
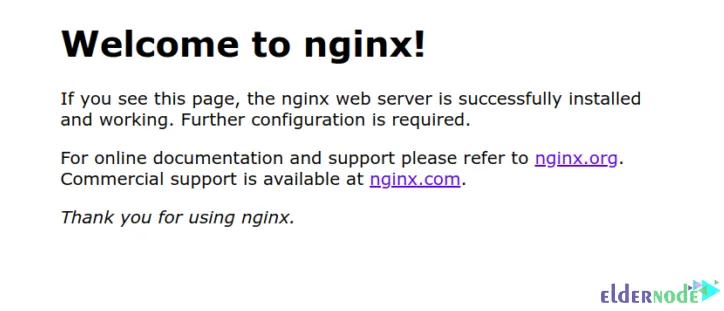
In this section, you will learn how to access the Nginx web server on Arch Linux. To do this, open your web browser and navigate to the following URL:
http://your-server-ipYou will see the following screen:
Creating an Nginx Virtual Host on Arch Linux
Nginx virtual hosting feature allows you to host multiple websites on a single server. Firstly, create your website directory as shown below:
mkdir /usr/share/nginx/example.comAnd create an index.html file for your website with the help of the following command:
nano /usr/share/nginx/example.com/index.htmlThen add the following lines to the created file:
<html> <title>Nginx Web Server</title> <body> <h1>Welcome to Nginx Web Server</h1> </body> </html>Then you should create a directory as shown below to store your website content:
mkdir /etc/nginx/sites-enabledNow it’s time to create an Nginx virtual host configuration file. To do this, run the following command:
nano /etc/nginx/sites-enabled/example.comAnd add the following configurations:
server { listen 80; server_name test.example.com; location / { root /usr/share/nginx/example.com; index index.html index.htm; } }Save the file and close it.
Open the Nginx main configuration file to edit it:
nano /etc/nginx/nginx.confFind the http{ line and add the following lines below it:
include sites-enabled/*; server_names_hash_bucket_size 64;Remember to save and close the file.
In this step, verify Nginx for any syntax configuration error:
nginx -tYou should restart the Nginx service to apply the changes:
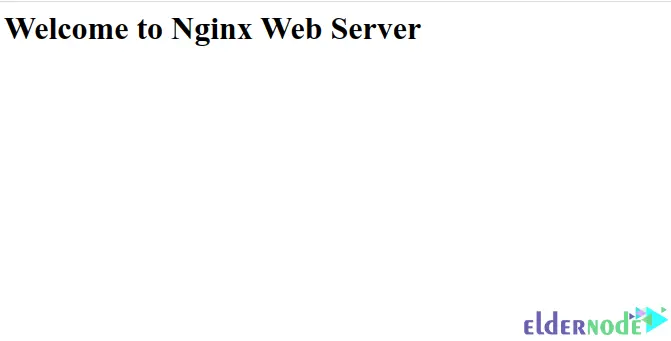
systemctl restart nginxLastly, open your web browser again and navigate to the following URL to verify Nginx Virtual Host:
http://test.example.comYou should see the following Nginx virtual host test page:
That’s it!
Conclusion
Nginx has high performance and is known for its security and stability so you can use it to host a website on the web. In this article, we taught you how to install Nginx on Arch Linux. I hope this tutorial was useful for you and it helps you to install Nginx on Arch Linux. You can contact us in the Comments section if you encounter a problem or have any questions during the installation process.