When you get a server, you need a control panel to use it better. The web hosting control panel is software that acts as a graphical interface between the user and the facilities available in the host. Many services are provided on them such as transferring files, sending and receiving emails, installing SSL security certificates, database management, domain management and etc. Cpanel is one of the famous control panels and this article will teach you How to Install and Configure cPanel on CentOS 8. If you intend to buy a CentOS VPS server, check out the packages offered on the Eldernode website.
cPanel is a secure and popular commercial hosting control panel for hosting services. It allows users to easily manage their web hosting server operations and Linux-based hosts; also it can be used through a powerful graphical user interface to manage shared, re-seller, business hosting services, and more. This control panel consists of two different user interfaces, which are a Client-based Interface and a Server Management Interface. You can log in from the client-based interface to fulfill your website requirements and the server management interface is not available to you.
In the continuation of this article from the CentOS training series, you will learn how to install and configure cPanel on CentOS 8.
Installing cPanel on CentOS 8
In this section, we will explain the installation process of cPanel on CentOS 8. Just follow the steps below and enter the required commands.
Your server should have a standard hostname. First of all, check your server’s hostname, if your server does not have a standard hostname, set it as follows:
hostnamectl set-hostname cpanel.eldernodecPanel is written in Perl, so you need to install Perl using the command below:
yum install perlYou can install cPanel using an automatic installer script. Before downloading the cPanel installer script, install the curl with the following command:
yum install curlNow it’s time to download the cPanel installer script. To do this, you should change the directory to /home and download it by running the command below:
cd /homecurl -o latest -L https://securedownloads.cpanel.net/latestsh latestComplete the installation wizard from cPanel’s web-based interface.
Finally, your session will be changed to the home directory, and the latest version of cPanel will be downloaded.
Configuring cPanel on CentOS 8
In this step, you will learn how to configure cPanel on CentOS 8. First, access cPanel WHM by running the following command:
https://SERVER_IP:2087Then provide your root user and password.
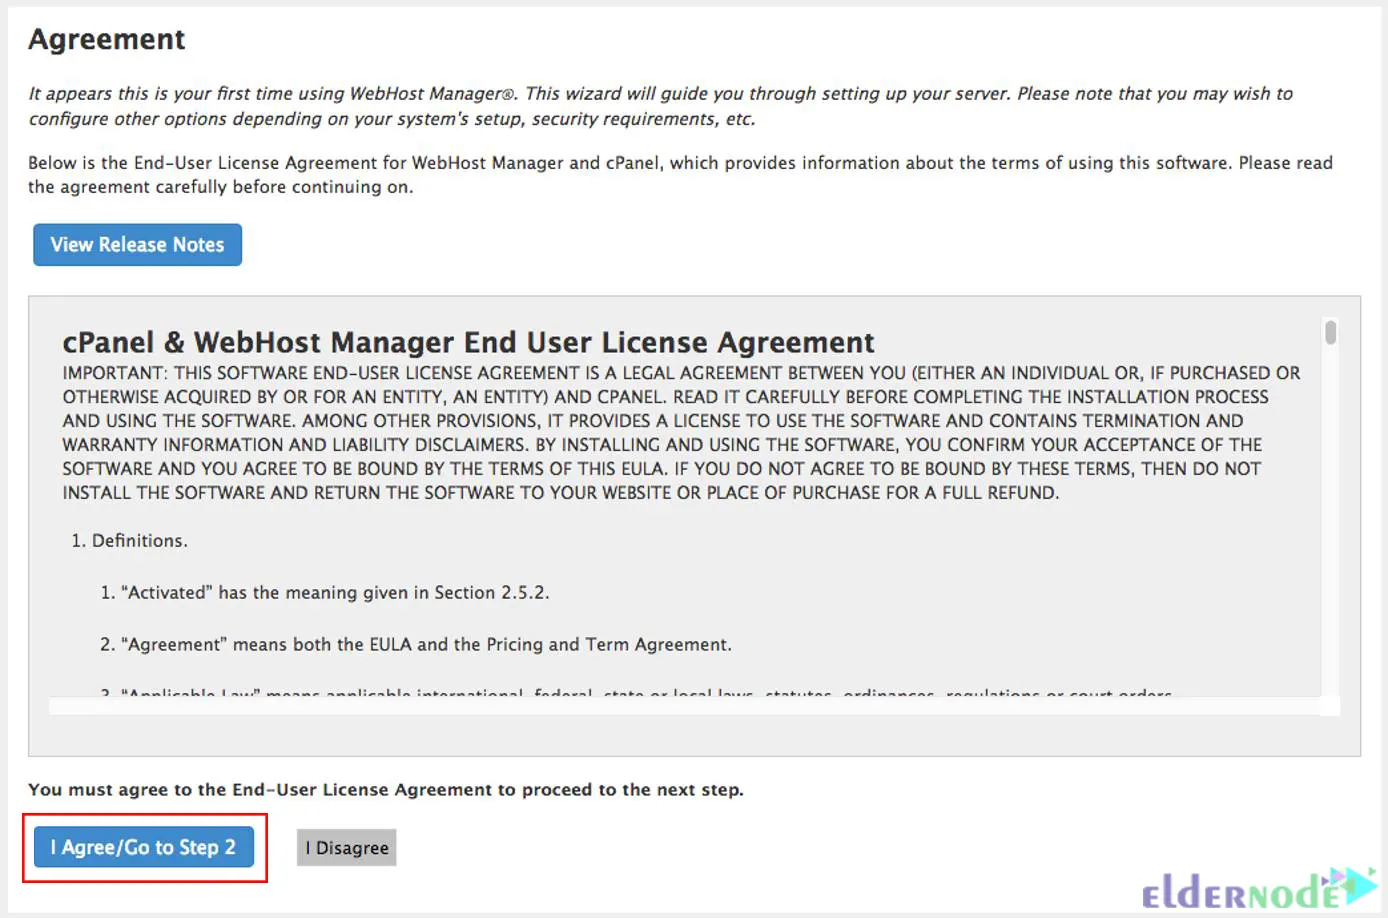
Once you logged in, accept the license agreement and click on I Agree/Go to Step2:
Navigate to the Setup Networking and remember to provide your server email address and SMS address to receive SMS. You can receive all necessary notifications to your email:
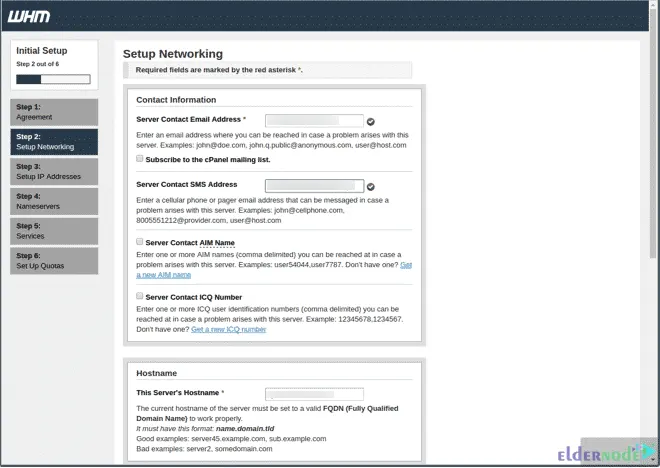
Now you should go to the Hostname> Networking path and put in the valid FQDN and server resolver values.
If you choose the Main network/Ethernet device, you will see the pre-defined IP address is the same as your server’s primary server IP address.
In this step, you need to set the server’s static IP address. To do this, choose the IP from the drop-down list and click on Go to Setup 4.
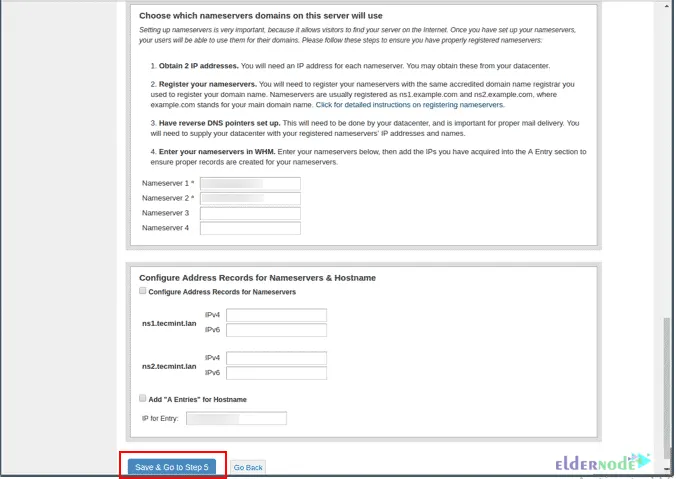
Then, you can add the A Entries for Nameservers (DNS) and the hostname of your server. If you want to add an entry for your hostname and nameserver, choose the check box and click on Save & Go to Step 5:
That’s it! You have successfully installed and configured cPanel on CentOS 8. Our website offers an economical CentOS VPS server, which can be the best choice for purchasing a VPS server.
Conclusion
cPanel is a commercial web-based control panel for server systems. In this article, we taught you how to install and configure cPanel on CentOS 8. I hope this tutorial helps you to install and configure cPanel on CentOS 8 and that you found it useful. If you have any questions or suggestions, you can contact us in the Comments section.
