Once in a while, different communication tools are introduced. Among them, Email is still the preferred method of transferring information online. As a website owner, editor, or author WordPress Content Management System allows you to manage your website and publish content without any programming knowledge. WordPress uses Email too. If the WordPress hosting server is not properly configured to use the PHP mail() function, you will face emails going missing. This article presents Tutorial Solve Email Send Problem On WordPress CMS. According to your needs, choose your considered package on Eldernode to purchase your own WordPress VPS.
Table of Contents
Solve Email Send Problem On WordPress CMS
One of the most popular and well-known plugins of WordPress that provide e-mail functionality is WP Mail SMTP. Simple Mail Transfer Protocol is the industry standard for sending emails that uses proper authentication which leads to high email deliverability. As you read above, the most common reason for the email send problem is the configuration. But since email service providers use a variety of tools to reduce email spam, they can detect that an email is really coming from the location that it claims to be from.
When emails sent by WordPress websites often fail this test, you face email send problems. In this way, when an email is sent out from your WordPress site, it may not even make it into the recipient’s spam folder let alone inbox.
However, to solve a problem, you should first check its probable reasons. In the following, you can review all the reasons WordPress can not send an email and you will get a solution for them.
Why WordPress is not sending emails
You may face an error while sending an email with your favorite mail client or software. Various reasons could be checked but most of the time, it is related to your SMTP server. This could also be with the plugin, the server, or the PHP issue. Let’s see all the probable problems when you are unable to send emails:
1- Internet Connection
First of all, check if you are connecting to the internet. It is the simplest way to start this troubleshooting before changing any setting.
2- SMTP server details
The most common mistake is to set up a mail client with the SMTP parameters.
3- Usernames and passwords
Another simple mistake and easy way of checking the issue is about username and password. So, you can double-check the login details.
4- SMTP port
SMTP usually uses port 25 to send an email. Some ISPs may block port 25 because of spam traffic. So, you can use port 587 or 465.
5- Antivirus or firewall settings
You will also need to verify that your firewall or antivirus has blocked the computer’s protection systems or not and set up a proper rule.
6- Configuration Issue
The most common for WordPress not sending emails is server configuration. If your server is not configuring to send emails, you need to configure it to use the PHP mail() function.
7- Email Plugin
Checking the server is an easy solution too. To do this, you need to add a plugin to test this to make sure that you can even send emails.
8- Spam Control
You should ask users who report they are not receiving your emails about their Spam folder. Since some email clients are automated, they might identify emails from WordPress as spam.
How to fix Email Send Problem On WordPress CMS
SMTP moves emails on and across networks. So if your server isn’t configuring to send emails, it will make it possible. In this section, you will learn to use a third-party SMTP provider and link it with your site so it will send emails again.
Since your WordPress email is not being sent, let’s learn how to switch over to SMTP instead.
Install the WP Mail SMTP Plugin
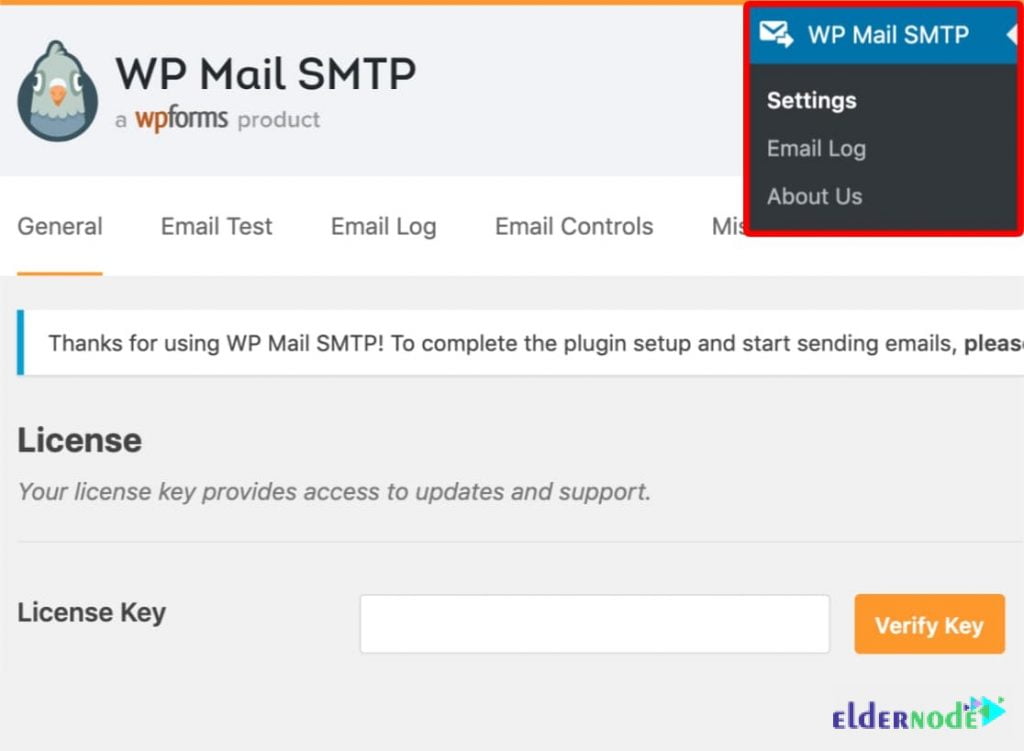
With any SMTP service, you must have the WP Mail SMTP plugin installed on your site to be able to switch WordPress from using the built-in PHP mail() function to using your SMTP service. First of all, you need to download, install and activate the WP Mail SMTP plugin from the WordPress repository. When WP Mail SMTP is activated, you are ready to configure it. To configure the plugin settings, click on WP Mail SMTP in your WordPress dashboard.
Then, enter the name and business email address you wish your site’s emails to come from.
Note: The email address must be the same as the one you will be using for your SMTP mailing service.
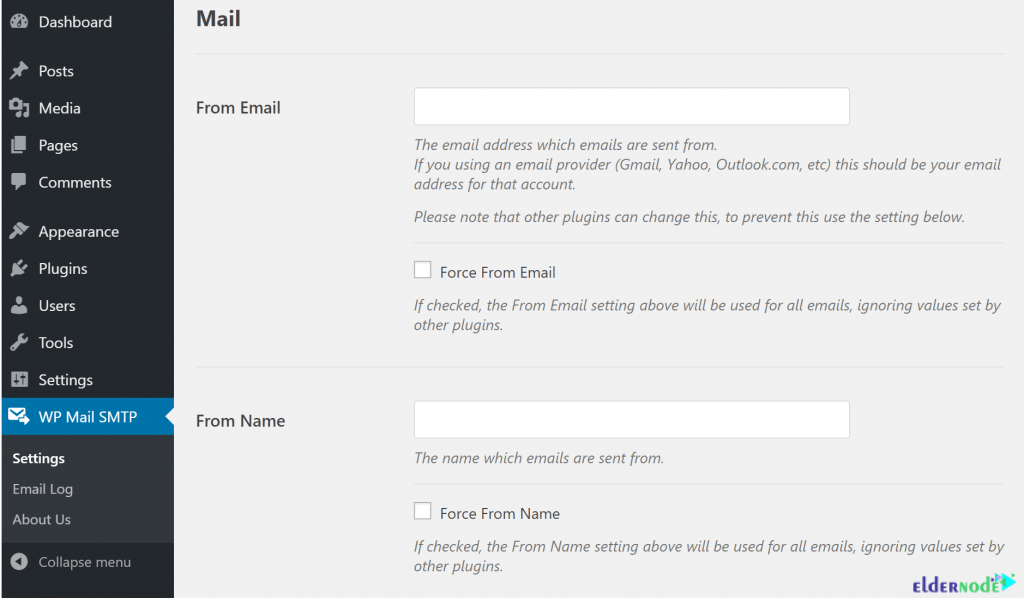
Even if other plugins like WPForms have different settings, you can force emails to use this name and email address. Next, you should choose an SMTP mailing service for your site. So, you can choose to set up SMTP suing Sendinblue, Gmail, Amazon SES, or Office365.
Use Google SMTP email servers
Let’s see how to use a free Gmail account from Google and the company’s SMTP servers. To set up an account, open the Gmail website. When your account is set up, download and install the Gmail SMTP plugin from the WordPress Plugin repository.
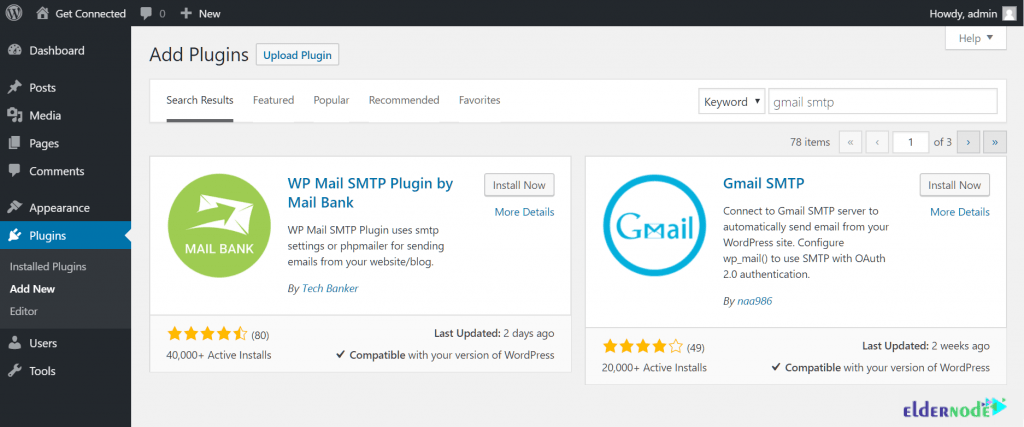
When the activation is finished, go to Settings >> Gmail SMTP to configure the plugin.
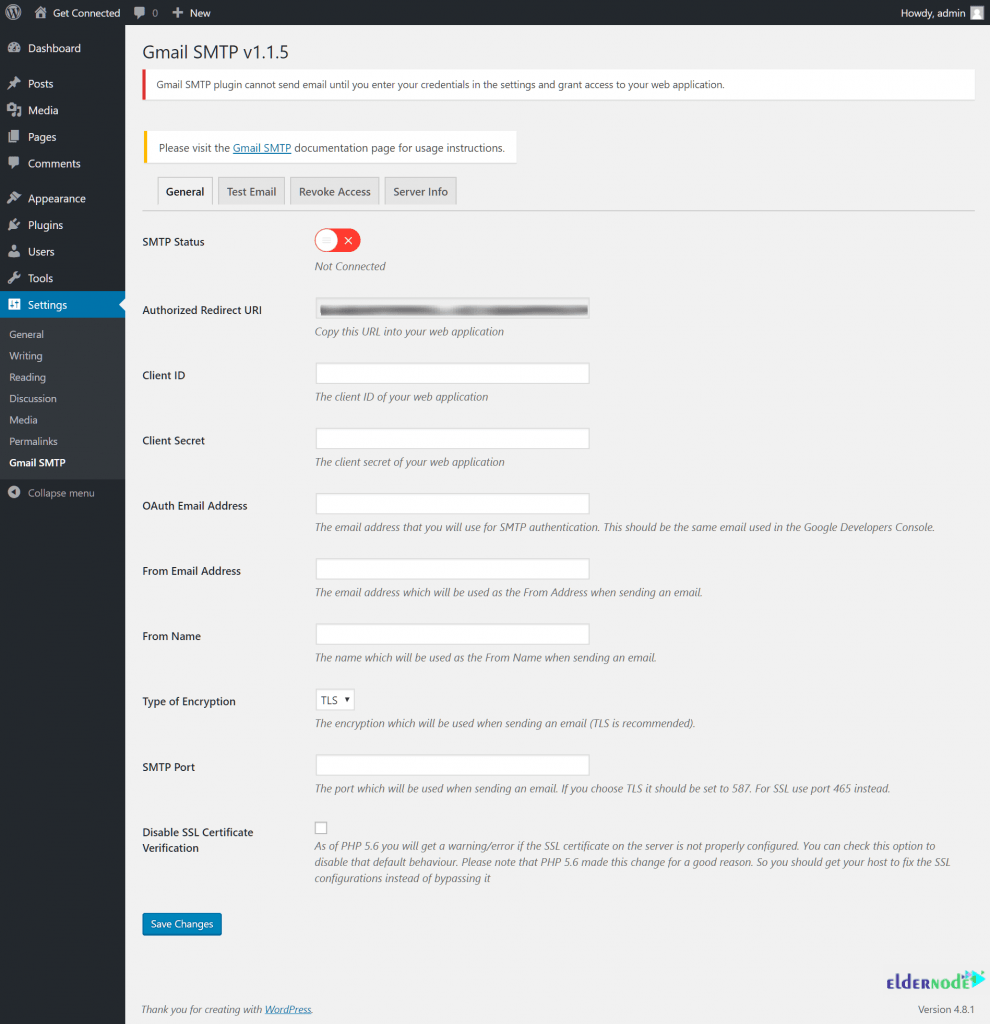
Create a set of secure credentials to authorize your WordPress installation to use Google’s email servers. And finally, log in with your newly created Gmail account details, or another Google account.
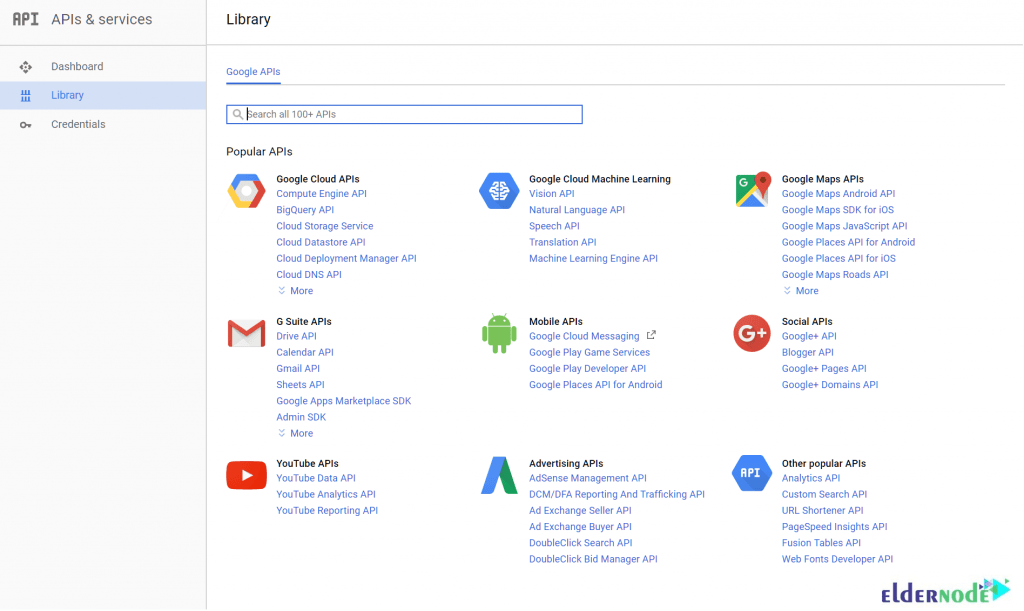
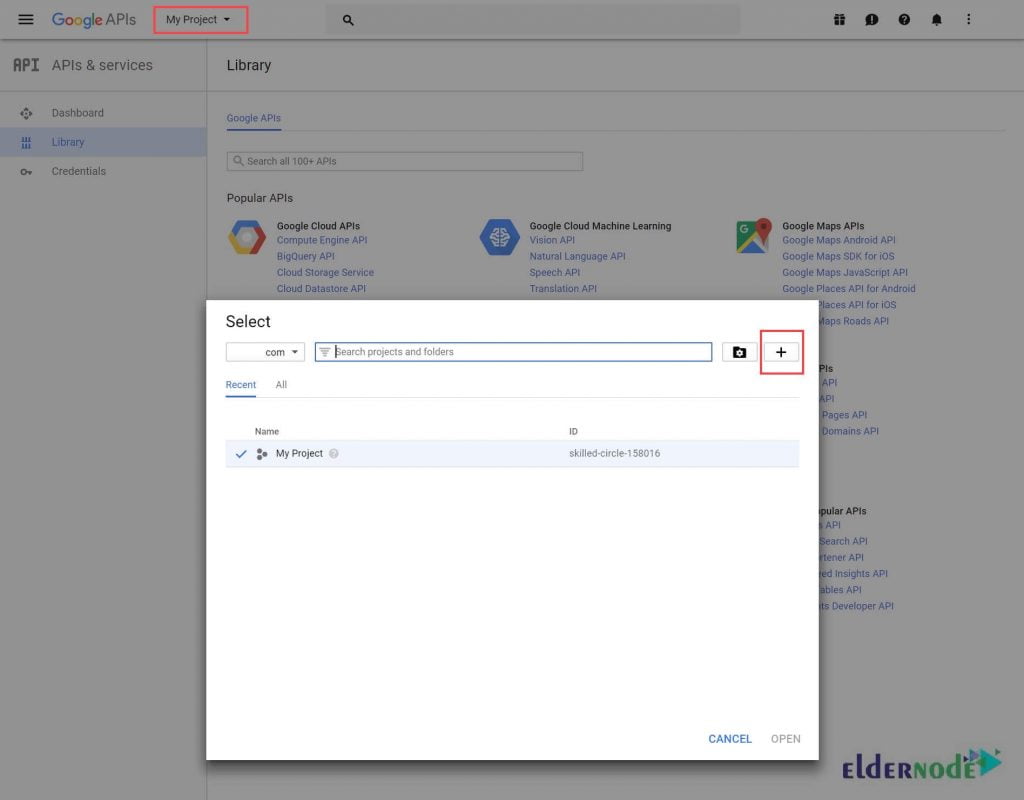
At this point, to create a new project, click on the My Project link at the top of the screen and then click the Add (+) button to create a new project.
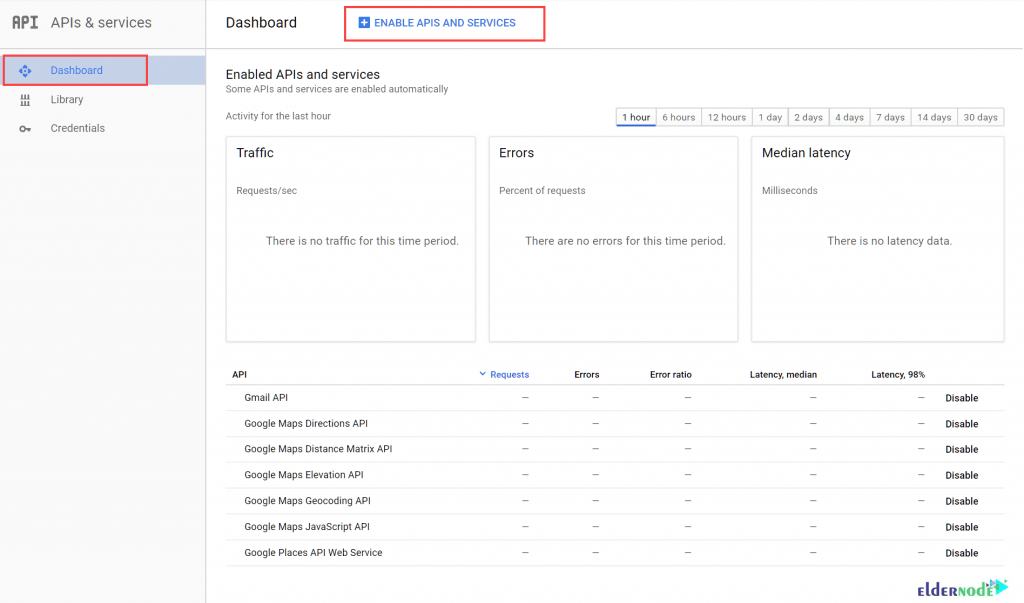
Create any name you wish for the project and click the Create button. Then, click Dashboard in the sidebar to be able to click the Enable APIs and Services link at the top of the screen.
Then, under Google Workspace APIs, select the Gmail API link.

Now, to create access credentials for use with the Gmail API, click on Enable link. To proceed, select Credentials from the sidebar, then click the Create credentials button.

As shown below, select OAuth client ID in the menu. To create an OAuth client ID, you need to first set a product name.

In the Application type screen, select Web application and then click the Create button. Enter a name for OAuth client ID, then head back to your WordPress admin dashboard.
Finally, copy the contents of the Authorized Redirect URI field into the relevant field of the Gmail API Create client ID page.
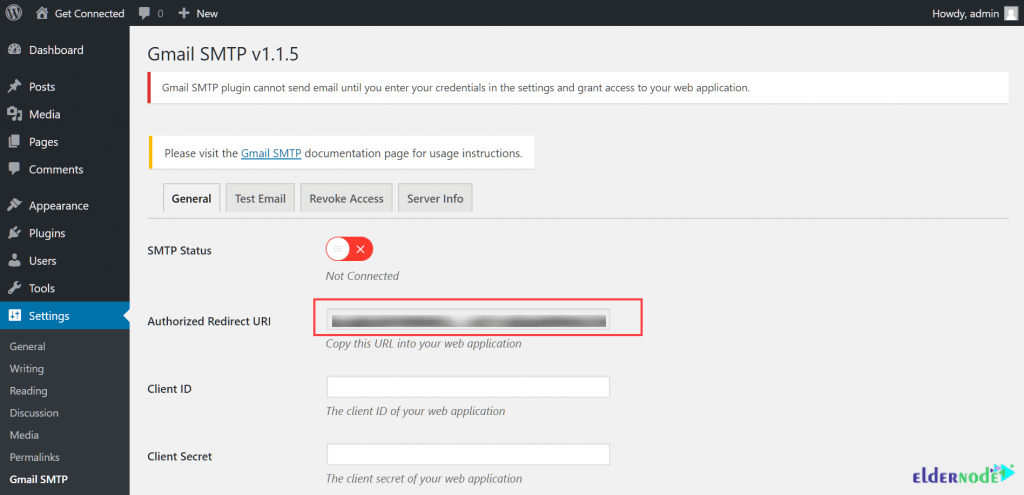
Once you click on Create button, a set of OAuth client credentials will be displayed on the screen.

Therefore, you need to copy and paste the Client ID and Client Secret into the plugin’s Settings page.
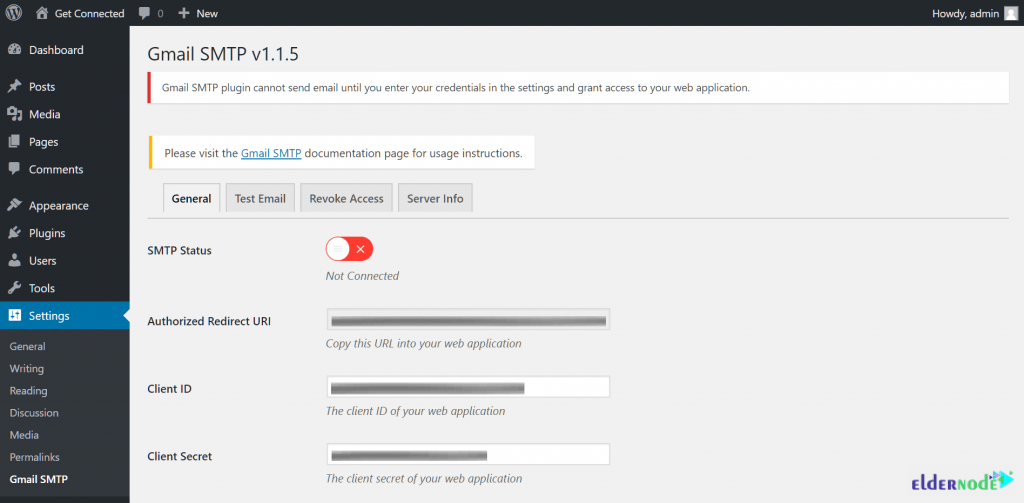
Finally, click Save Changes to proceed and click the Grant Permission button that appears.

That’s that! You just need to enter your Gmail account credentials to authorize the connection. Then, check that your SMTP Status now reads Connected. You can now proceed to the Test Email tab to try out the new email connection.
Conclusion
In this article, you learned How to Solve Email Send Problem On WordPress CMS. You reviewed all probable reasons that may cause a problem for WordPress during sending an email. The explained solutions could be useful to solve any one of them. Finally, as an option, you learned how to use Google SMTP email servers. Ask your friends on Eldernode Community if they have chosen other applications.

![How to Configure Gulp.js on Ubuntu 20.04 [Focal Fossa]](https://blog.eldernode.com/wp-content/uploads/2020/11/How-to-Configure-Gulp.js-on-Ubuntu-20.04-Focal-Fossa-300x164.png)
