If you connect from a Windows client to a Windows file server, your communication will be established without any problems due to the same communication protocols between the two operating systems. But to connect the Windows client to a server file from the Linux or Unix operating systems, you will need a communication protocol. Samba is a communication protocol between Linux and Windows. In this article, we are going to teach you how to configure Samba on Debian. Also, you can visit the packages available in Eldernode if you wish to purchase a Linux VPS Hosting.
Table of Contents
What is Samba?
Samba is a protocol, networking tool, and standard Windows interoperability suite of programs for Linux and Unix. The name Samba is derived from SMB, which stands for Server Message Block and is the name of the standard protocol used by Microsoft Windows Network File System. Samba allows Windows to share files and printers on a Unix host, and also allows Unix users to access shared resources on Windows systems. Samba is free software that re-implements the SMB/CIFS network protocol. Andrew Tridgell developed the first version of Samba Unix in December 1991 and January 1992.
Samba Features
- Offers good performance under heavy loads
- Offers secured data transfer
- Supports NT-style printing service (SPOOLSS)
- Supports POSIX extensions for CIFS/SMB
- Supports NetBIOS over TCP/IP (NBT)
- Easy and quick to deploy
- Allows concurrent operations
- Multichannel technology
How to Install Samba on Debian
Before doing anything, update your packages list with the following command:
sudo apt updateSamba is available on Debian default repositories. You can install Samba by running the following command:
sudo apt install samba smbclient cifs-utilsThe following dependencies will also be installed with Samba:
The following additional packages will be installed: attr ibverbs-providers keyutils libcephfs2 libgfapi0 libgfrpc0 libgfxdr0 libglusterfs0 libibverbs1 librados2 librdmacm1 python3-cffi-backend python3-cryptography python3-dnspython python3-gpg python3-markdown python3-pygments python3-requests-toolbelt python3-samba python3-tdb python3-yaml samba-common samba-common-bin samba-dsdb-modules samba-vfs-modules tdb-toolsSuggested packages:
winbind python-cryptography-doc python3-cryptography-vectors python3-sniffio python3-trio python-markdown-doc python-pygments-doc ttf-bitstream-vera bind9 bind9utils ctdb ldb-tools ntp | chrony smbldap-tools ufw heimdal-clientsThe following NEW packages will be installed:
attr cifs-utils ibverbs-providers keyutils libcephfs2 libgfapi0 libgfrpc0 libgfxdr0 libglusterfs0 libibverbs1 librados2 librdmacm1 python3-cffi-backend python3-cryptography python3-dnspython python3-gpg python3-markdown python3-pygments python3-requests-toolbelt python3-samba python3-tdb python3-yaml samba samba-common samba-common-bin samba-dsdb-modules samba-vfs-modules smbclient tdb-toolsHow to Configure Samba on Debian
At this point, you need to change the Samba Global settings. The Samba configuration file is located in /etc/samba/smb.conf. To do this, you should open the file with your favorite text editor and change your desired settings:
nano /etc/samba/smb.confNow it’s time to create a shared Samba directory in which you can share both public and private directories:
sudo mkdir /public sudo mkdir /privateThen you need to add two directories to a Samba conf. To do this, open the file in your text editor and edit it:
nano /etc/samba/smb.confRemember to add shares and authentication methods at the end of the file to access it:
[public] comment = Public Folder path = /public writable = yes guest ok = yes guest only = yes force create mode = 775 force directory mode = 775 [private] comment = Private Folder path = /private writable = yes guest ok = no valid users = @smbshare force create mode = 770 force directory mode = 770 inherit permissions = yesIn this step, you should create Samba Share User and User Group to access the Private share. You can create the group by entering the following command:
sudo groupadd smbshareNext, you should add the necessary permissions for the private share:
sudo chgrp -R smbshare /private/ sudo chgrp -R smbshare /publicTo set the appropriate directory permissions run the following command:
sudo chmod 2770 /private/ sudo chmod 2775 /publicValue 2 at the beginning of the above command stands for SGID bit, which allows newly created files to inherit the parent group.
To access a private share, you need to create a no login local user. To do this, run the following command:
sudo useradd -M -s /sbin/nologin sambauserThen you should add the user to the Samba share group as below:
sudo usermod -aG smbshare sambauserRemember to create an SMB password for the user with the following command:
sudo smbpasswd -a sambauserFinally, enable the created account by entering the following command:
sudo smbpasswd -e sambauserHow to Verify the Samba configuration
You can test the config file with the help of the following command:
sudo testparmNow you need to create demo files in the Samba shares. To do this, run the following commands:
sudo mkdir /private/demo-private /public/demo-public sudo touch /private/demo1.txt /public/demo2.txtYou should restart the service by executing the following command to apply the changes:
sudo systemctl restart nmbdIf you have a Firewall running, you can enable remote access from the specified IP range using the following command:
sudo ufw allow from IP-range to any app SambaNote that you should enter your IP instead of the IP-range in the above command.
How to Access the Shares from the Client
First, you should have access to the share from your local device. You can do this with the following command:
$ smbclient '\\localhost\private' -U sambauser Enter WORKGROUP\sambauser's password: Try "help" to get a list of possible commands. smb: \> ls . D 0 Tue Apr 26 02:10:34 2022 .. D 0 Tue Apr 26 02:04:41 2022 demo1.txt N 0 Tue Apr 26 02:10:34 2022 demo-private D 0 Tue Apr 26 02:10:24 2022 39987708 blocks of size 1024. 32647972 blocks available smb: \> exitSetting up a Windows Client
You can access the share from Windows using the IP address of the Samba share system.
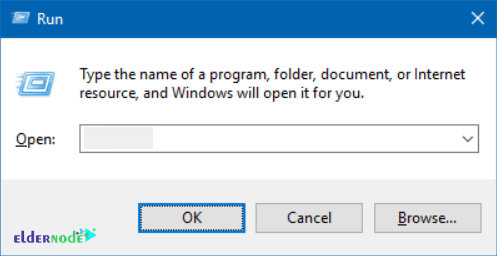
First, you should open a run box by pressing Win+R and then enter your IP.
Then you will see the shared folders. Create a file in one of the shared folders.
The created file should be viewed on the Samba server device.
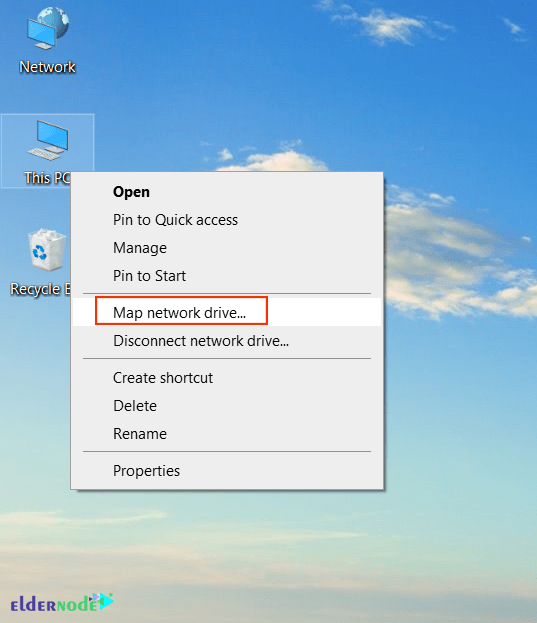
Next, you need to install the Samba share on your Windows system. To do this, right-click on This PC and select Map Network Drive.
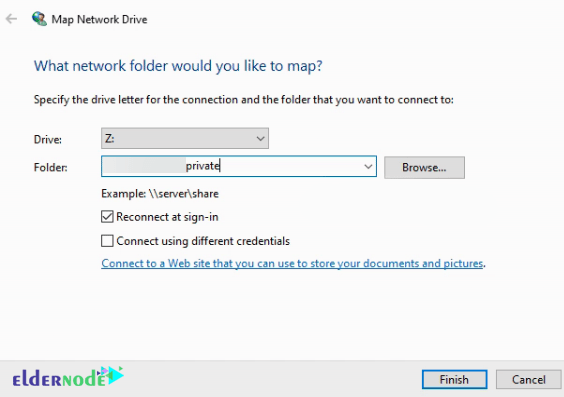
Now you need to fill in the Path details.
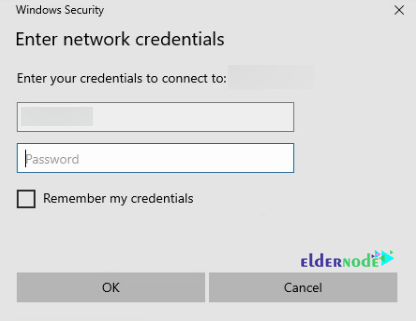
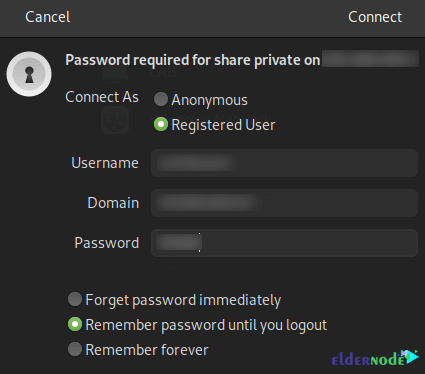
Then you should enter the Samba user credentials.
Finally, the share will be available to you.
Setting up a Linux Client
To set up the Linux client, you should install the Samba packages using the following command:
sudo apt install samba-client cifs-utilsAfter the installation is complete, go to the File Manager and select Other Locations. Then you can add your share using the following syntax:
smb://servername/Share_nameNow you should enter the Samba user credentials.
Finally, you will have Samba share available.
How to Uninstall Samba on Debian
You can remove Samba with the following command:
apt-get remove sambaThe following command can remove the entire samba packages along with the configuration files:
sudo apt-get purge sambaPurge is identical to remove except that packages are removed. That’s it!
Conclusion
In this article, we taught you how to configure and uninstall Samba on Debian. After installing Samba, you can share files over the network between Windows and Linux systems. I hope this article was useful for you. You can ask your questions in the comments.