Search engines have always been an integral part of the web and the Internet. Bing Webmaster Tools is one of the specialized SEO tools designed by Bing and provided to webmasters to check and control the status of their site in the Bing search engine. Google is not the only search engine that benefits from webmaster tools. Bing is the second most popular search engine in the world, and its webmaster tools have features, some of which you may not even find on Google Webmaster. This article presents the Tutorial Add Website To Bing Webmaster. To buy a cheap VPS with Instant Activation, order what you need on Eldernode.
Table of Contents
How to Add Website To Bing Webmaster
Bing Webmaster Tools is a free web service offered by Microsoft. It offers extra free SEO tools (Backlinks, Keyword research tools, SEO reports) that Google does not. One backlink is required (at least) backlink before Bing will be able to find it. To get your business listed on Bing, it is not required to have Webmaster Tools since it will automatically discover, render, and index your website. But you are recommended to manually submit the URLs of the site to Bing Webmaster Tools to reach more audiences. In addition, Bing is growing fast and its ranking algorithm is different than Google So, let’s get more traffic to your site.
To submit your website to Bing Webmaster Tools, you need to follow the below steps. It is not complicated at all, just make sure to do it correctly. To add your site to the Search Console account, you need to prove that you own the site. Also when you add a site, Managing Search Console access Bing Webmaster Tools will periodically validate the site ownership status by accessing your Search Console account.
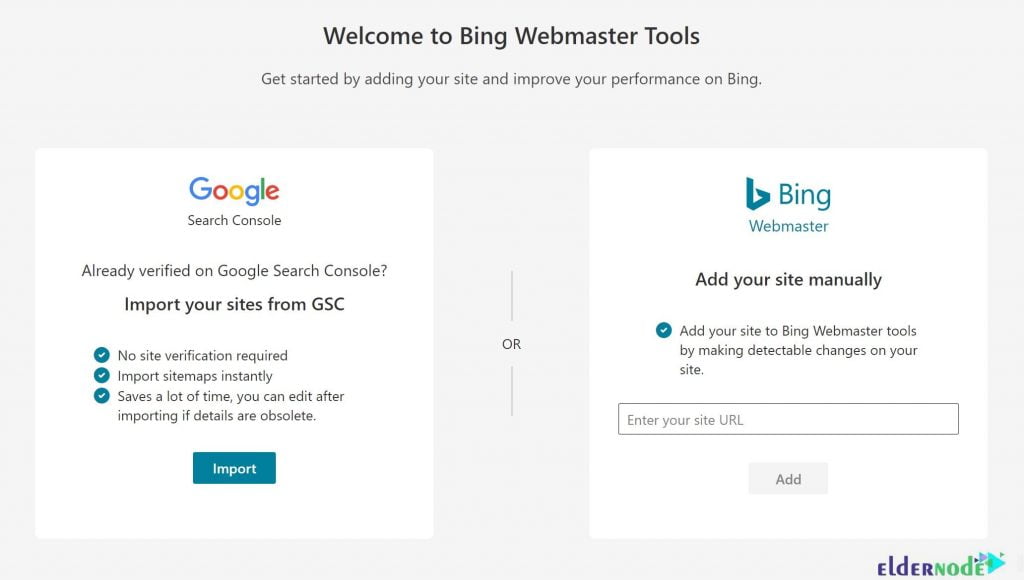
How to Import from Google Search Console
There are two ways of adding a website for a new user. Let’s review the first way.
If you have a verified account with Google Search Console, you can import your user details directly into Bing. Bing Webmaster Tools needs permission to access information from your Search Console account to display the list of verified sites present in your Google Search Console account along with the number of Sitemaps and corresponding roles for each site. Then, you will be able to select your desired sites you wish to add to Bing Webmaster Tools and click Import. If you face no issue, the selected sites will be added and automatically verified in Bing Webmaster Tools.
How to Add a Website to Bing Webmaster Manually
The second way of adding a website is to do this manually.
At first, you must refer to Bing WebMaster Tools by one of your popular browsers.
In the next step, you must log in to your account.
So, you can add your website manually by entering the URL in the input box and clicking add.
As shown below, for existing users, you can add a website from the drop-down on the left nav and proceed with the same steps as above.
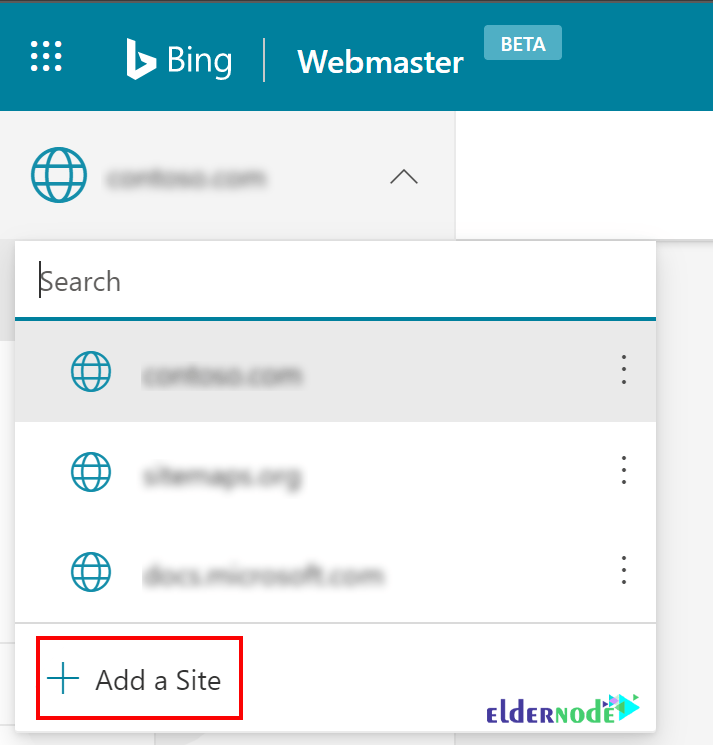
When you add a site, it takes about 48 hours for the system to generate analytics and data. However, if you need to delete any one of the sites you added, go to the left nav itself through more options.
To see the list of Search Console accounts linked to your Bing Webmaster Tools account. Then, go under the Profile section. You can also stop Bing Webmaster Tools from accessing your Search Console account. To do this, you need to choose the disconnect option present beside the account details in the Profile section.
How to Verify Ownership of your Website
When you make sure that a new website is added to your account, it is time to verify you own the site by proving ownership. To complete this addition, there are four ownership verification methods. In the following, you can review all these four methods to choose which is the best suited for your site.
1- DNS Auto Verification
In this method, you should log in to your DNS account and CNAME will be automatically added to the DNS account. To automatically detect the DNS provider and take over the CNAME insertion task, Bing Webmaster Tools supports Domain Connect standard. Since Domain Connect should be adopted by the DNS providers, only DNS providers who have adopted Domain Connect and have partnered with Bing will be able to see the verification option.
Just in certain cases, sending the website ownership signal to Bing Webmaster may be time-consuming for the DNS provider. Otherwise, after a successful login, the website will get verified in Bing Webmaster Tools within few seconds.
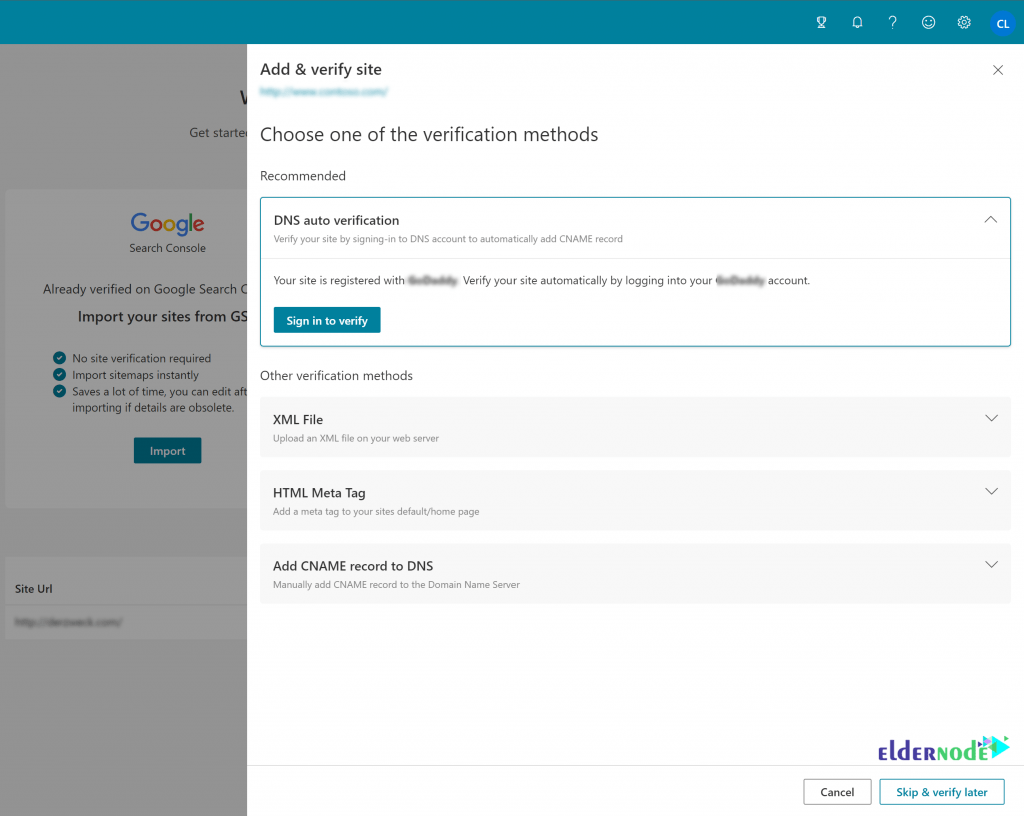
2- XML File Authentication
The second way lets you use XML file authentication. To do this, you need to save the custom XML file, which contains your customized ownership verification code. Click BingSiteAuth.xml to save it and upload the file to the root directory of the registered site.

3- Meta tag Authentication
To use the third method, follow the below path:
_ Copy the displayed <meta /> tag with your custom ownership verification code to the clipboard.
_ Open your registered site’s default page in your web development environment editor and paste the code at the end of the <head> section
Finally, make sure the <head> section is followed by a <body> tag. Then, upload the revised default page file containing the new <meta /> tag to your site.

4- Add CNAME Record to DNS
If the website is not supported for Domain Connect protocol, you will not be able to see and use this method for verification. But if you can use the last method, you must access your domain account since you can only edit the CNAME record inside your account.
Hold the series of numbers and letters (verification code) that are sent to you. Once you complete editing, your ownership of the site will be verified.

Conclusion
According to an agreement, Bing and Yahoo are not two separate platforms anymore. They are merged using one algorithm developed by Bing. So, if you submit your website to Bing, you are automatically doing so for Yahoo. In conclusion, whatever pages are indexed by Bing, the same pages are indexed on Yahoo. In this article, you learned How to Add your Website To Bing Webmaster.
[yasr_visitor_votes size=”medium”]
